
Keys & electronicsToyota Prius ZVW30
Prius ZVW30 Fuse Boxes: JDM Locations & Circuit Reference
Find the May 2010 JDM Prius engine-room and passenger-footwell fuse references. Selected socket/audio circuits, an original locator diagram and safe boundaries before a fuse purchase.
- Time
- 10–15 minutes to prepare a service request
- Difficulty
- Easy
- Tools
- 2 needed
- Instructions
- 5 steps
Applies to Toyota Prius ZVW30 · Japan ZVW30, May 2010 Toyota manual, printed pages 375–381. Japan ZVW30, May 2010 Toyota manual, printed pages 375–381. Always compare the described parts, labels and specifications with your own vehicle and manual.
For owners in New Zealand These are the cited Japan-market references, not local-market specifications or evidence of parts availability.
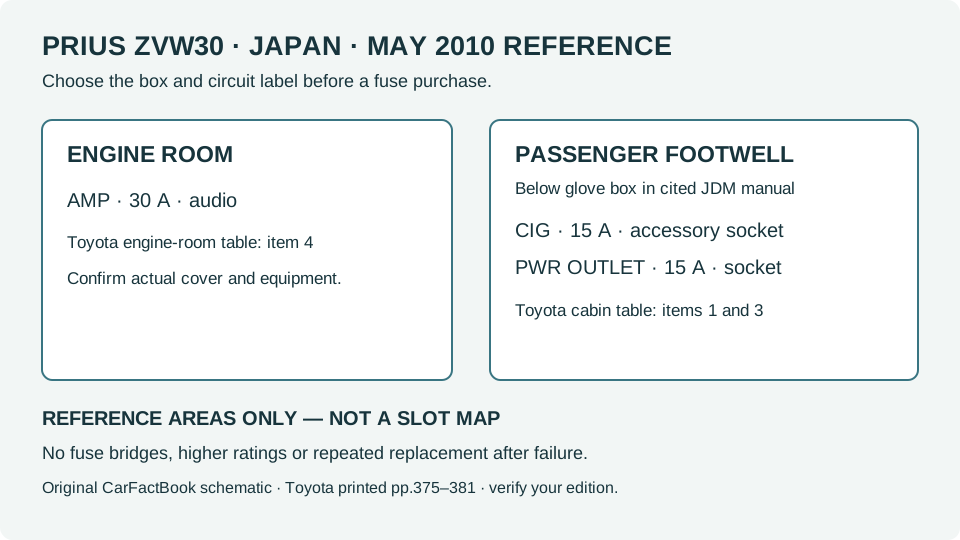
Identify before you buy
Choose the correct box before choosing a fuse
| What you have | What the evidence establishes | Next owner decision |
|---|---|---|
| Passenger footwell: CIG | 15 A; accessory socket, cited cabin table item 1 | Match the actual circuit and cover; not a diagnosis. |
| Passenger footwell: PWR OUTLET | 15 A; accessory socket, cited cabin table item 3 | Do not assume it is the same circuit as CIG. |
| Engine room: AMP | 30 A; audio, cited engine-room table item 4 | Check the audio installation and correct box. |
| Different layout or recurrent failure | This reference cannot establish a safe replacement | Use the matching manual and qualified electrical assessment. |
Selection aid only. An unknown or conflicting configuration needs confirmation before purchase.
Have these references ready
- Exact chassis and production-period record
- Relevant manual and itemised service proposal
Step-by-step instructions
Choose the correct manufacturer-backed specification
Use these source-backed checks to identify the option for your exact equipment. This is a selection guide, not a hands-on replacement procedure. If a component or label looks different on your car, stop and check your own manual.
- Step 1 of 5
Match the JDM manual before using a location diagram
Toyota's cited edition identifies an engine-room box and a passenger-footwell box below the glove box. Do not substitute an export-market left-hand-drive diagram or assume driver-side and passenger-side mean the same physical side. The original diagram here distinguishes reference areas; it is not a physical slot map or a wiring schematic.
All steps ↑ - Step 2 of 5
Start with the failed function and the exact circuit label
Write down which devices fail together, whether the failure is constant and whether accessories were recently fitted. In the passenger-footwell table, CIG and PWR OUTLET are separate 15 A accessory-socket entries; the engine-room AMP entry is 30 A for audio. One dead socket therefore does not identify a particular fuse without the matching diagram and cover.
All steps ↑ - Step 3 of 5
Confirm the box, label and installed equipment together
Use the manual's numbered illustration alongside the actual cover label. Check the equipment notes and production edition, especially for aftermarket audio, alarms or charging accessories. Do not select a fuse solely by its colour, a photograph from another Prius or a similarly named circuit in a different box.
All steps ↑ - Step 4 of 5
Treat the rated fuse as protection rather than a repair upgrade
Toyota requires the specified rating and genuine or equivalent fuses, prohibits modification of the fuse/box, and calls for inspection if a replacement blows again. An uprated fuse, wire bridge or repeated replacement cannot be used to bypass a fault. Some circuits involve safety or hybrid systems; this guide provides no work instructions for them.
All steps ↑ - Step 5 of 5
Prepare an electrical-service request when the cause is unclear
Give the technician the failed functions, box/circuit reference, recent accessory history and any repeat failure. Ask for the identified cause and the proposed corrective work before authorising a loom, module or battery. Refer to Toyota's complete procedure for actual access and handling; no fuse-pulling or electrical-probing sequence is supplied here.
All steps ↑
References & limitations
Where these instructions come from
Japan ZVW30, May 2010 Toyota manual, printed pages 375–381
Manufacturer facts are limited to the cited edition and configuration. The decision table and service-request checklist are original CarFactBook editorial aids, not a fault diagnosis, workshop procedure or approval of an unverified part.
Toyota Prius May 2010 JDM manual ↗Manual section: Printed pp.375–381: box locations, circuit tables, ratings and repeated-failure cautions
Instructions checked against manufacturer documentation; not a physical inspection of every vehicle.
- Toyota Prius May 2010 JDM manual ↗ — Printed pp.375–381: box locations, circuit tables, ratings and repeated-failure cautions