
Keys & electronicsNissan Note e-POWER HE12
Nissan Note HE12: Identify CR2025 Intelligent Key vs CR1620 Remote
By CarFactBook · Review source evidence and limitations
Do not guess the coin cell in a Nissan Note HE12 key. Nissan specifies CR2025 for Intelligent Key but CR1620 for a different screw-secured remote-entry system. Identify the actual key design before buying or opening it.
- Time
- 5–10 minutes
- Difficulty
- Easy
- Tools
- 3 needed
- Instructions
- 7 steps · illustrated
Applies to Nissan Note e-POWER HE12 · 2016–2020. Nissan Note E12/HE12 2016–2020 key styles described in Nissan's FAQ 6717; verify the actual fitted remote/key housing, not just the HE12 chassis code.. Always compare the described parts, labels and specifications with your own vehicle and manual.
Tools and materials
- Original Nissan vehicle key
- Nissan FAQ 6717 key-type images
- Only after confirmation: correct CR2025 or CR1620 coin cell
Illustrated instructions
Follow these steps
Follow each documented action alongside its supporting visual. If a component or label looks different on your car, stop and check your own manual.
- Step 1 of 7
Confirm the original HE12 key design
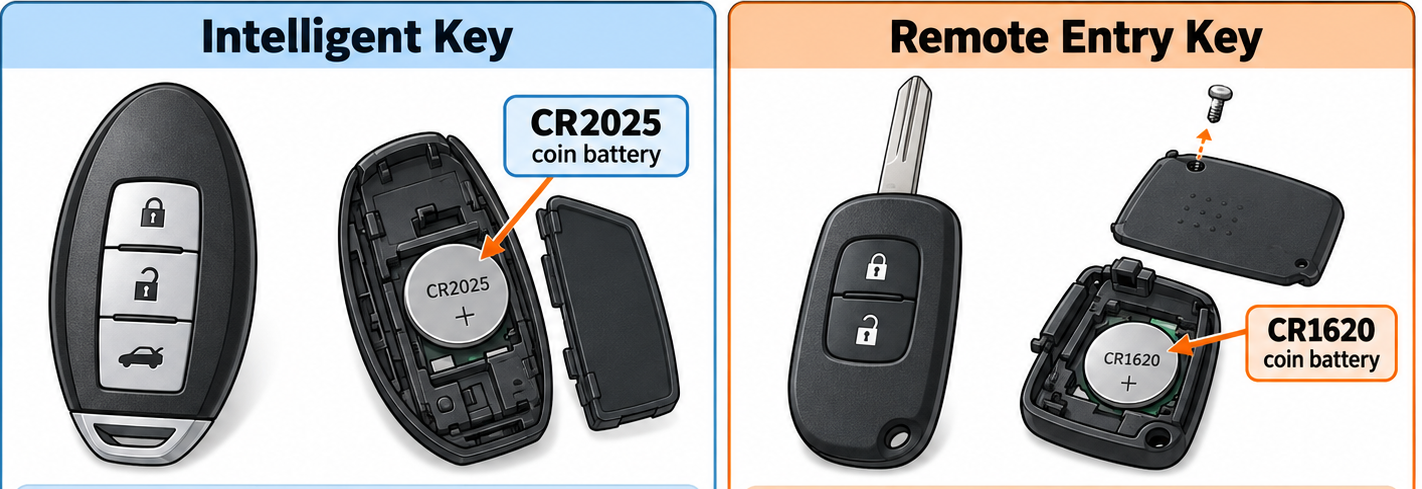
Instructional illustration · compare with your own vehicle and its manual Compare both sides of the actual Nissan key against the two designs in Nissan FAQ 6717: Intelligent Key versus Remote Control Entry. The correct cell type depends on this key design, not the engine or trim badge.
Check before moving onAll steps ↑Key matches one of Nissan's pictured originals.
- Step 2 of 7
Inspect the back for lock or screw
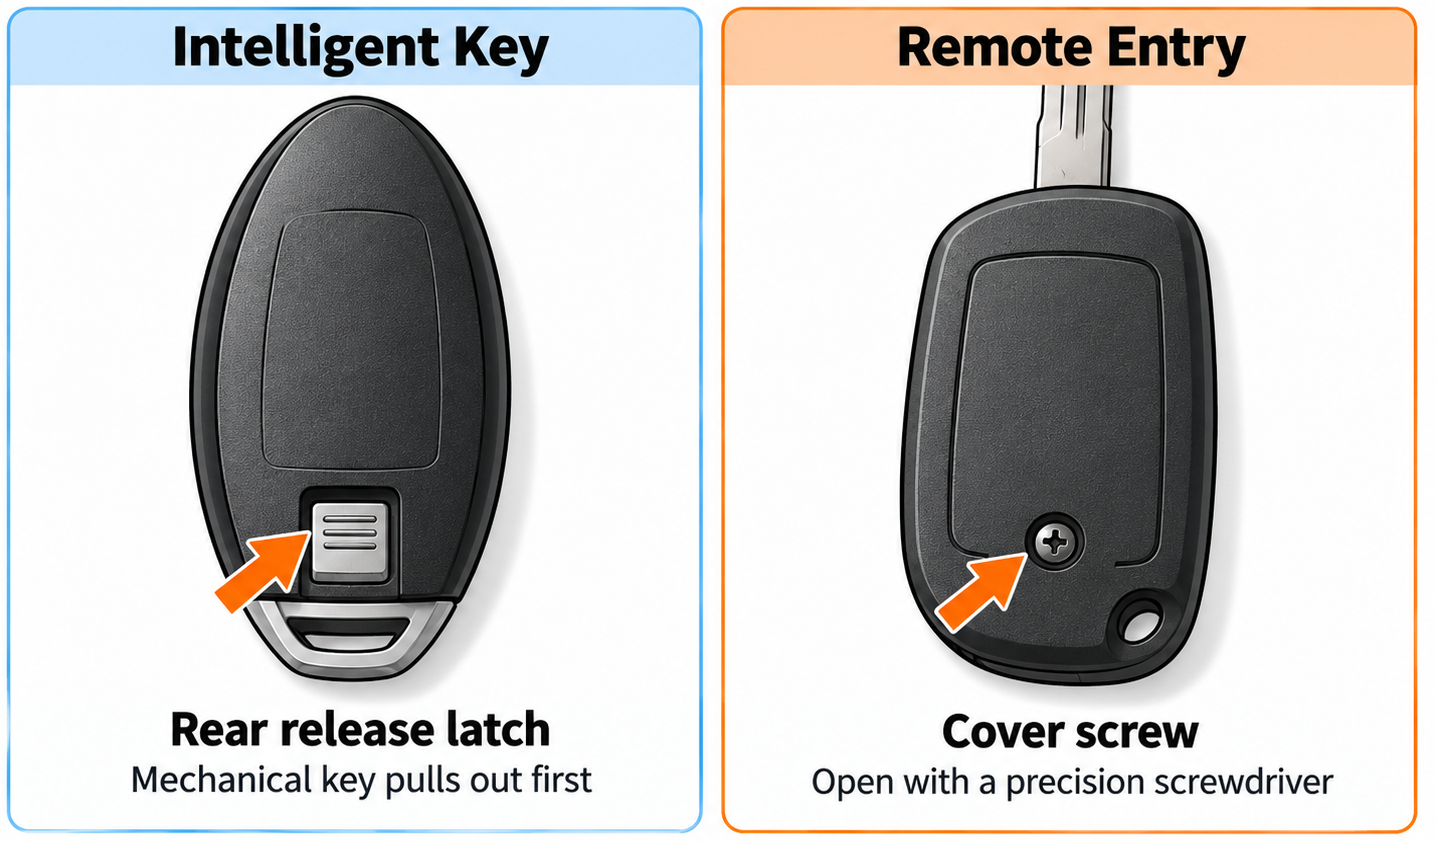
Instructional illustration · compare with your own vehicle and its manual Nissan's Intelligent Key has a locking release for an internal mechanical key; its procedure begins by withdrawing that key. The distinct Remote Control Entry unit uses a small screw and screwdriver to open the cover.
Check before moving onAll steps ↑You can identify whether it has the Nissan mechanical-key release or screw-secured cover.
- Step 3 of 7
Choose the matching battery size
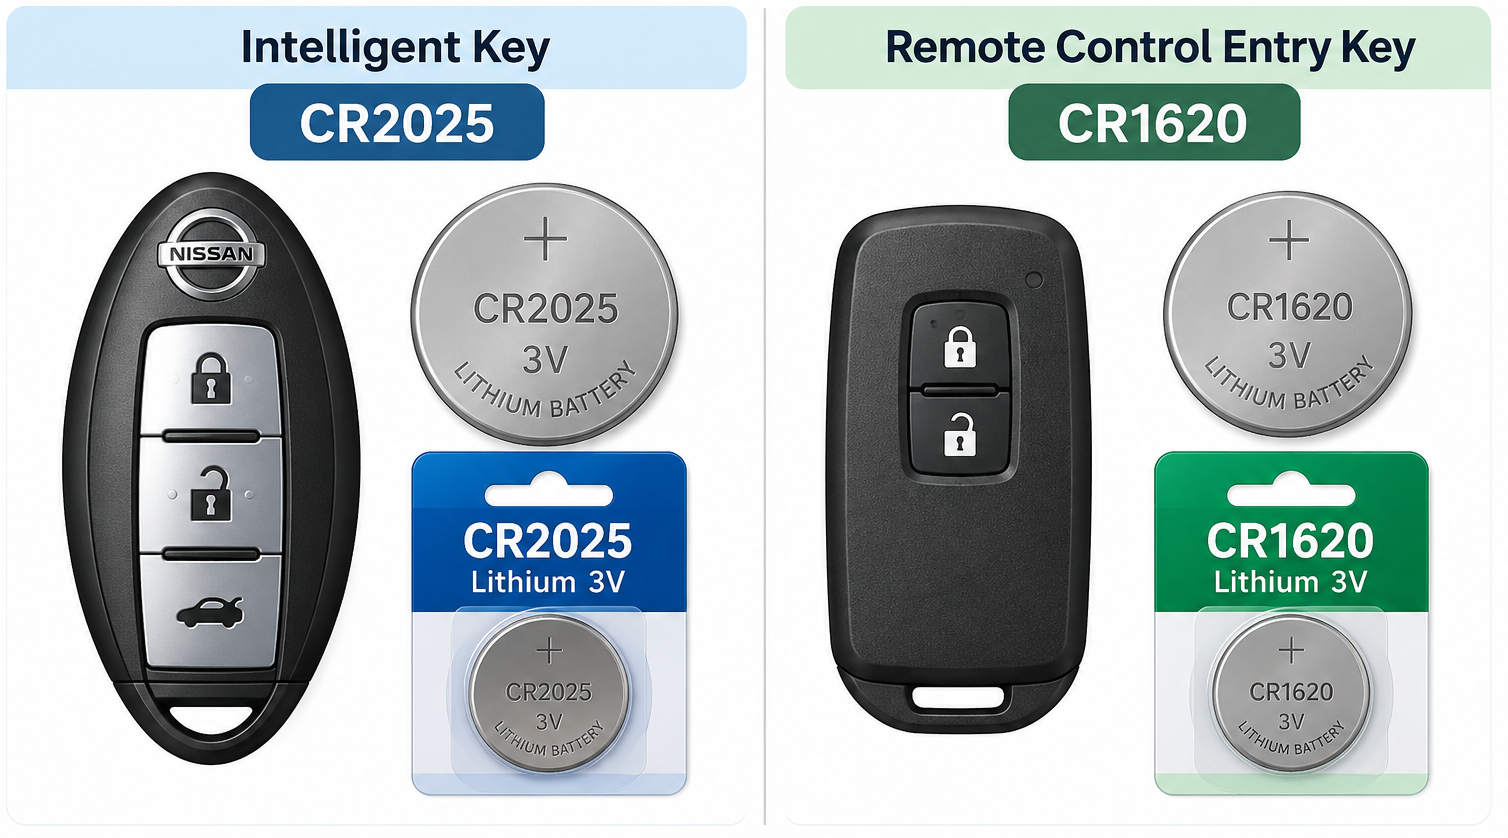
Instructional illustration · compare with your own vehicle and its manual For the Nissan Intelligent Key use CR2025. For the separate Remote Control Entry key use CR1620. Check the marking on the existing battery if still in doubt, but do not open an unfamiliar shell forcefully.
Check before moving onAll steps ↑Battery size is supported by the exact key type.
- Step 4 of 7
If Intelligent Key: remove mechanical insert first
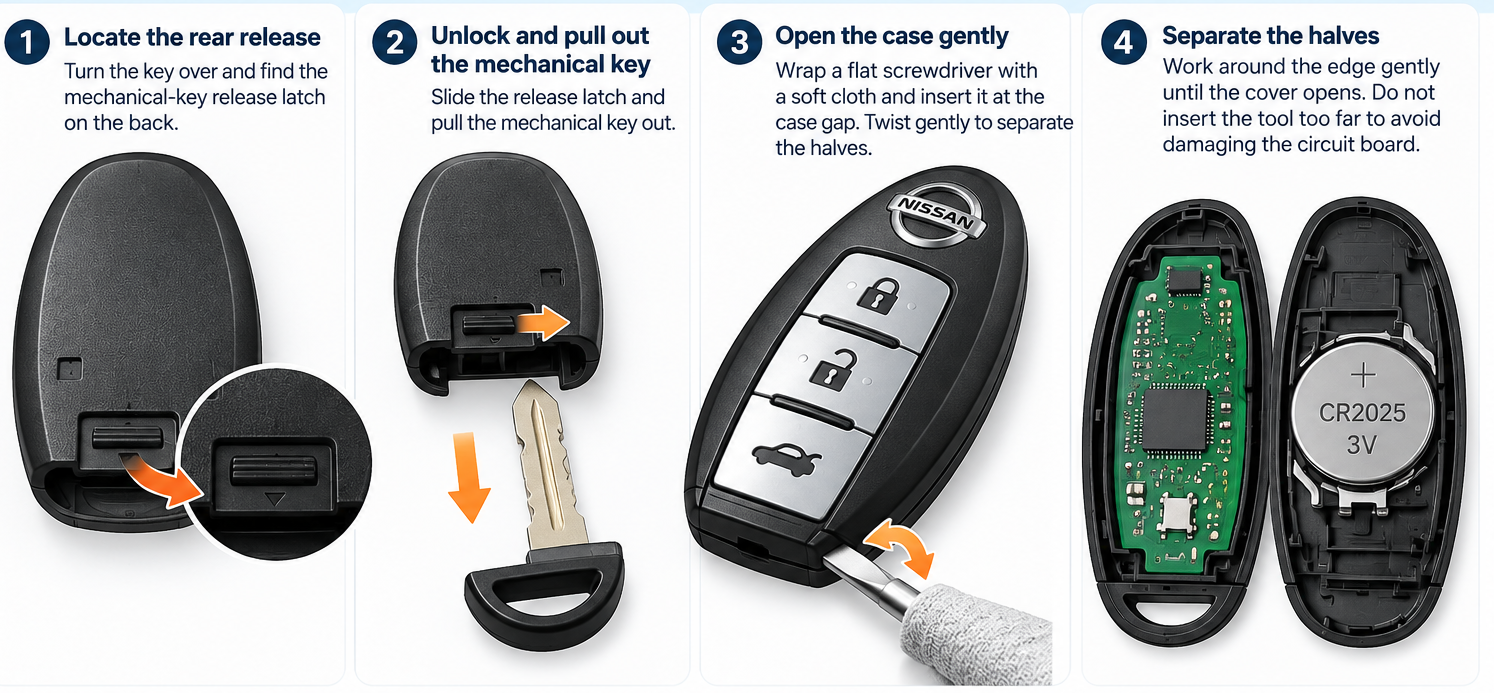
Instructional illustration · compare with your own vehicle and its manual For the CR2025 Intelligent Key, unlock the rear release and withdraw the mechanical insert, then use a cloth-wrapped flat screwdriver at the case gap to separate the halves gently. Nissan warns against inserting the tool too far and damaging the circuit board.
Check before moving onAll steps ↑Mechanical insert removed and housing opened without scratched electronics.
- Step 5 of 7
If Remote Entry: remove screw rather than pulling an insert
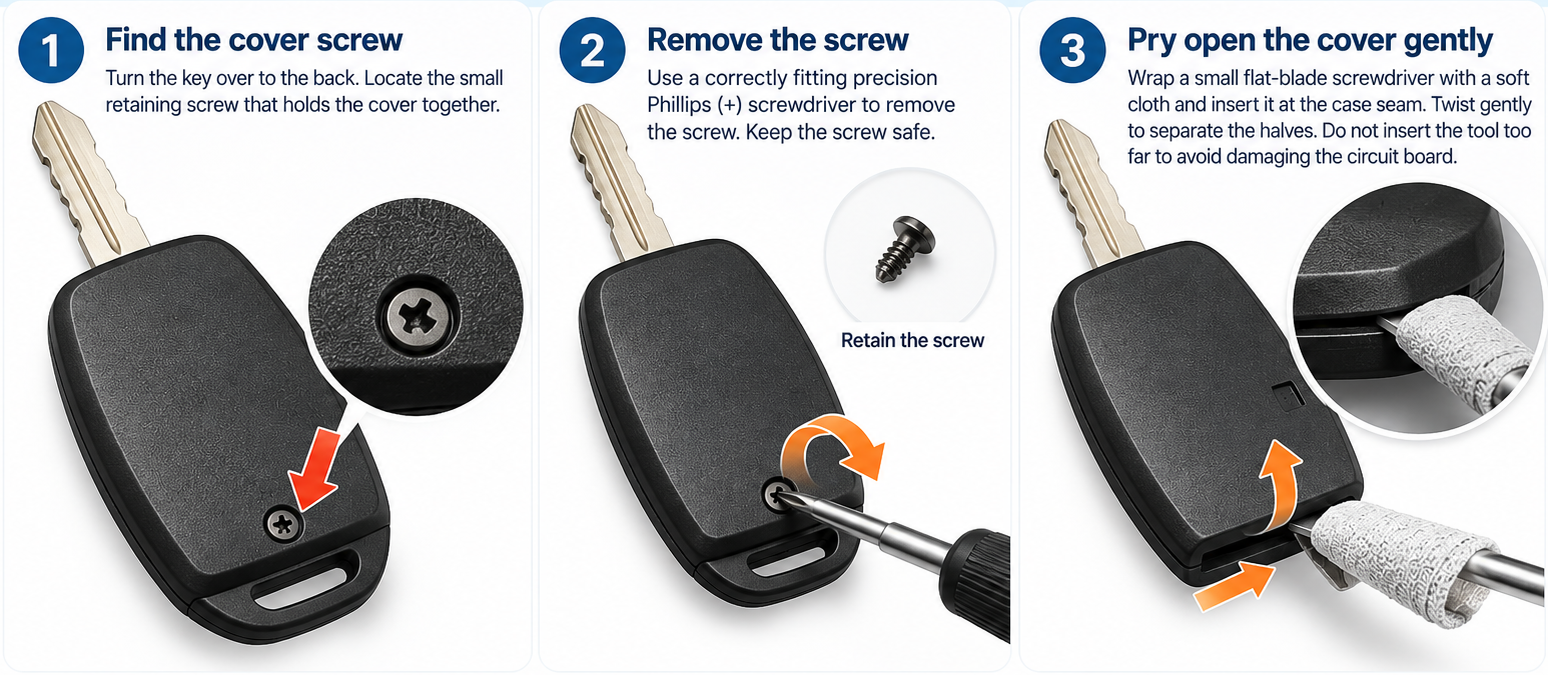
Instructional illustration · compare with your own vehicle and its manual For the CR1620 remote-entry variant, use a correctly sized cross-head precision screwdriver to remove the case screw, then a cloth-protected small flat screwdriver at the seam. This differs from the Intelligent Key mechanism; do not apply both approaches.
Check before moving onAll steps ↑Screw is safely retained and cover separates without strain.
- Step 6 of 7
Fit battery with the Nissan-documented polarity
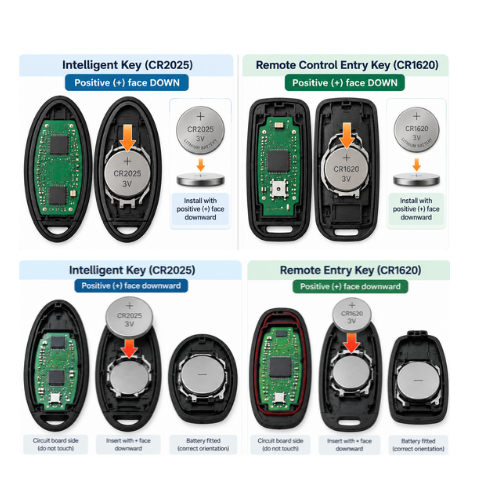
Instructional illustration · compare with your own vehicle and its manual Nissan's FAQ directs the new cell to the board-free side of the opened housing, with its positive (+) face downward in the illustrated procedure. Keep hands/tools away from the circuit contacts and verify polarity against the exact case before fitting.
Check before moving onAll steps ↑Correct size and polarity for the identified remote.
- Step 7 of 7
Reassemble the correct key and test
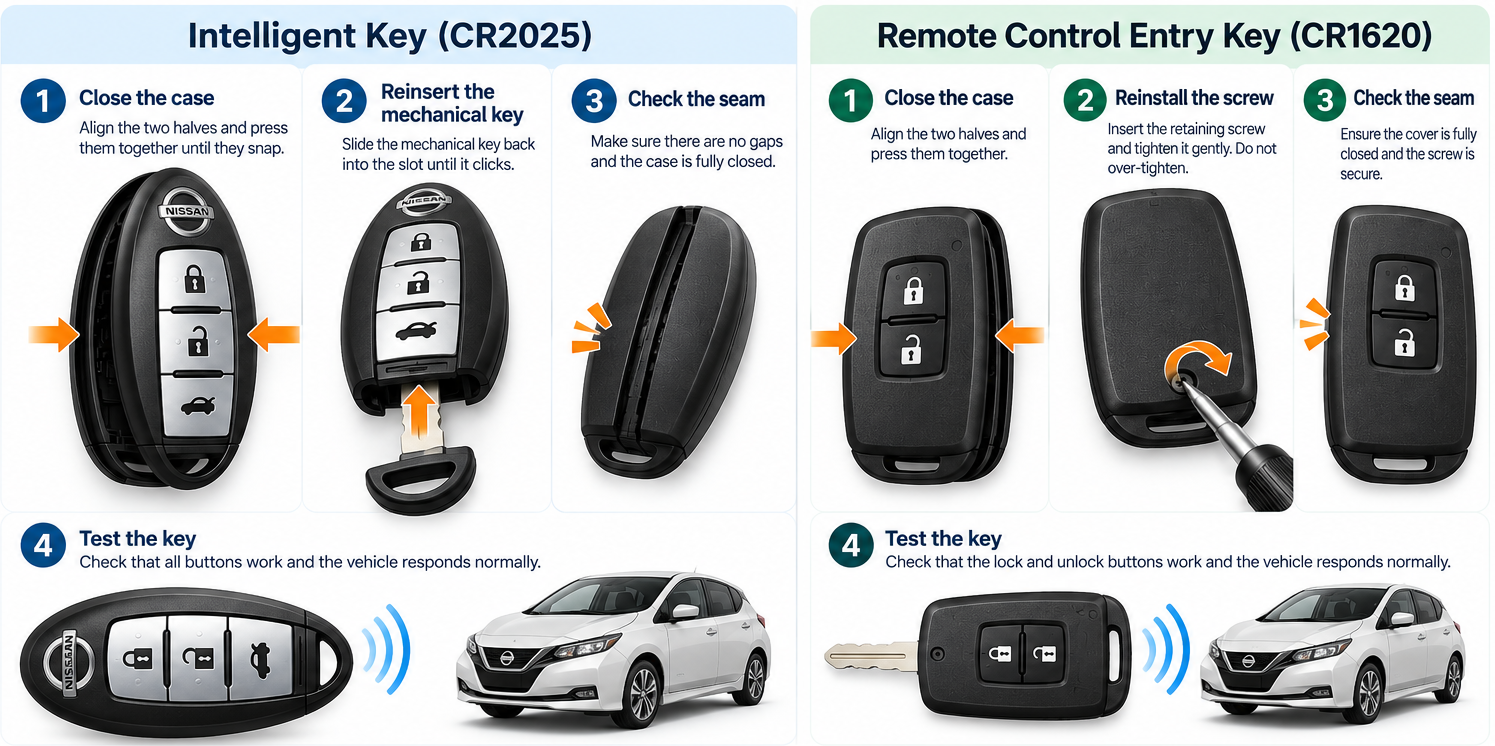
Instructional illustration · compare with your own vehicle and its manual Align cover ends and snap together. Reinstall and latch the Intelligent Key mechanical insert or securely refit the Remote Entry screw as applicable. Test functions; Nissan recommends a dealer if it does not operate afterwards.
Check before moving onAll steps ↑Case fully closed and buttons respond.
References & limitations
Where these instructions come from
Nissan Note E12/HE12 2016–2020 key styles described in Nissan's FAQ 6717; verify the actual fitted remote/key housing, not just the HE12 chassis code.
CR2025 is for Intelligent Key; CR1620 and a case screw apply to a distinct remote-entry key. Plus polarity faces downward in Nissan's depicted replacement operation. This is a key-type identification guide, not a universal generic key opening guide.
Nissan official manufacturer owner reference ↗Manual section: Nissan Note E12 (2012–2020) / HE12 (2016–2020) FAQ 6717, sections 'Intelligent Key' CR2025 replacement and 'Remote Control Entry System' CR1620 replacement; opening mechanism and polarity.
Instructions checked against manufacturer documentation; not a physical inspection of every vehicle.
Illustrations explain the general action. They are not photographs or proof of exact component geometry.